Minecraft Resolution Settings: A Comprehensive Guide [Updated 2025]

Adjusting the resolution in Minecraft can significantly impact the visual experience and overall game performance. Resolution refers to the number of pixels displayed on the screen, directly affecting clarity and sharpness.
Changing Minecraft’s resolution can be useful in several ways. On low-end devices, lowering the resolution can improve performance. On high-end devices, increasing the resolution enhances visual quality. Players can alter the resolution through various methods, including modifying Java arguments, using the Minecraft launcher’s built-in settings, or using third-party tools like OptiFine.
Commonly Used Resolutions in Minecraft:
While higher resolutions can be beneficial for tasks like detailed skin creation, players should choose a resolution that best suits their hardware and preferences.
Ways to Adjust Minecraft Resolution
The methods for changing Minecraft resolution vary slightly depending on whether you’re using the Java Edition or the Bedrock Edition (often played on consoles).
1: For Java Edition
The Java Edition of Minecraft, designed primarily for PC, offers extensive control over game settings, including resolution. Here are several ways to adjust the resolution in the Java Edition:
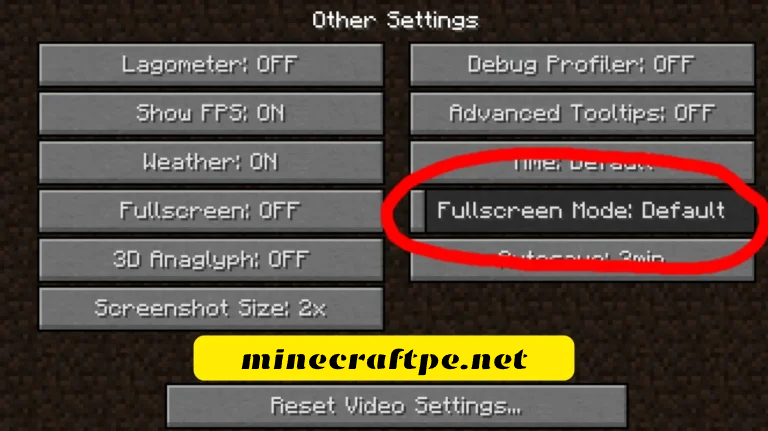
1: Full-Screen Mode Method:
This is a straightforward method for changing resolution within the game itself:
- Launch Minecraft and go to the main menu.
- Click on “Options…”, then select “Video Settings”.
- Locate the “Fullscreen” option.
- Toggle the “Fullscreen” option to “ON”. You may then be able to select a desired resolution from a dropdown menu or, after toggling, a new “Resolution” option will appear.
- For low-end PCs, a resolution of 800×600 is often recommended.
- A resolution of 1024×768 can provide a balance between performance and visual quality.
2: Using Java Arguments (JVM Arguments):
This method gives you precise control over the resolution:
- Open the Minecraft Launcher.
- Click on the “Installations” tab.
- Select the game profile you want to modify and click the three dots, selecting “Edit”.
- Enable “JVM Arguments.”
- In the JVM Arguments text box, you can add commands to set the resolution. Before existing commands, you will need to add: -width [your desired width] -height [your desired height]. For example: -width 1920 -height 1080 for a 1920×1080 resolution. Replace the bracketed values with your desired values.
3: Using Third-Party Tools (OptiFine)
OptiFine is a popular mod that provides enhanced graphics and performance options, including more resolution settings:
- Download and install OptiFine.
- Launch Minecraft using the OptiFine profile.
- Go to “Options…”, then “Video Settings”.
- Within the OptiFine video settings, you’ll find more granular resolution control options.
2: For Console Edition
The Console Edition (Bedrock Edition), designed for platforms like Xbox and PlayStation, offers a more streamlined approach to resolution adjustments. Here’s how to change the resolution:
PlayStation:
- Launch Minecraft.
- Navigate to the “Settings” menu, and then to “Video” settings.
- You may not find explicit resolution control, but your system settings may be what affects your resolution. Ensure they are optimal.
- PlayStation consoles typically aim for a 1080p resolution in Minecraft for optimal visual clarity.
Xbox:
- Start Minecraft.
- Go to “Settings” and find the “Video” section.
- You may not find explicit resolution control, but your system settings may be what affects your resolution. Ensure they are optimal.
- Xbox consoles often target a 1080p resolution for a good balance of visuals and performance in Minecraft.
It’s important to note that consoles often automatically adjust visual settings based on the connected display and system capabilities. Direct resolution control within the Minecraft game menus on consoles is often limited or absent, unlike the PC (Java) edition.
3: For Bedrock Edition
Minecraft Bedrock Edition, designed for platforms like mobile devices and Windows 10, generally manages resolution automatically to optimize performance. Direct resolution controls are typically limited. However, you can influence visual quality:
In-Game Settings (Limited Control):
- Launch Minecraft and go to “Settings” from the main menu.
- Select “Video”.
- While there’s no specific “Resolution” setting, options like “Render Distance” and “Graphics” (Fancy, Fast, etc.) impact visual quality. Lower settings improve performance, effectively reducing rendering workload.
External Tools (Advanced, Primarily for Windows 10):
For potential (but not officially supported) resolution adjustments on Windows 10, you could try alternative launchers:
Important Note: Bedrock Edition prioritizes automatic optimization for ease of use. Unlike the Java Edition, direct resolution control is often not directly available to the user.
Common Problems & Solutions
Here are some common issues that can arise when adjusting resolution in Minecraft, along with potential solutions:
Problems:
Problems:
Pros & Cons
Pros
Cons
Conclusion
Adjusting Minecraft resolution is a simple yet effective way to optimize both visual quality and performance. Increasing the resolution can make the game block-based world more detailed and vibrant, enhancing visibility and overall immersion.
The optimal resolution depends on your device’s capabilities. Lower resolutions can improve performance on older or less powerful hardware, while higher resolutions can take advantage of powerful systems to deliver a more visually appealing experience. The best approach is to experiment with different settings, considering your device’s specifications, Minecraft edition, and personal preferences, to find the ideal balance between visual fidelity and smooth gameplay.